Porcelain Insulator News
by Jack H. Tod
Reprinted from "INSULATORS - Crown Jewels of the Wire", September 1976, page 27
RESTORING PORCELAIN INSULATORS
A small ping or chip on a glass insulator usually isn't very noticeable, and
this is true on porcelains with a white glaze. The same small defect on an
otherwise nearly mint porcelain with any other glaze color is a real detraction
as soon as you glance at the display shelf. It's even worse when a pretty large
chip is missing, letting all that white underbody show through.
This embarrassing white underbody showing through the middle of your pet brown
insulator is then the key to the solution of the restoration job, and the
complete opacity of the porcelain makes an easy repair possible.
First, fill in the chip or any missing parts of the rim or other areas with
any type of good tile cement, Plaster of Paris, Spackle or whatever. The harder
cements are more durable. Make sure to wet the porcelain first to achieve a good
bond. Don't worry about evenness or contour, but just build it up at least as
far as the insulator surface contour, allowing some for shrinkage when drying.
After drying thoroughly, you can carve, file and sand the filler perfectly
smooth to match the insulator contour.
Now paint the repaired area with a matching color. Any paint source giving
the exact color will do. If there is any mottling of the insulator or a lighter
shade such as at wire groove edges, you can duplicate this by rubbing the paint
off slightly at these points to cause lighter areas as required.
If you use glossy lacquers, you're done. If a flat paint is used, let it dry
and then cover with a coat of clear nail polish or other clear lacquer to impart
glossiness.
Now the very final and most important step of all. Print the word
"RESTORED" very carefully on a sticker and attach it to the underpart
of the insulator. Put at least one coat of clear lacquer over this label to
firmly hold it down.
It is amazing haw a completely unsightly specimen can be restored so it is no
longer an embarrassment on your shelf. I have restored specimens broken so badly
they wouldn't stand up by themselves to the point where you can hold them in
your hand and not be able to detect any repairs even if you are told to look for
them. This is why it is so very important to firmly attach the RESTORED sticker,
since even you yourself may not know later which insulators have had repairs. I
do not mind buying carefully restored items at shows when I have the repair
pointed out to me, but it is disconcerting to think you've bought a virgin mint
only to later get home and find the whole cable ear has been restored.
I have in my collection a number of pin types which are the only one known of
that type and which were in either moderately damaged condition or very sad
condition as the result of coming from insulator factory dumpage or from utility
company bulldozing etc. These unique specimens must be preserved on the shelf
for reference, and it is worth the effort to restore even the saddest ones to
virtually mint condition. Some shelves were rather unsightly before that.
Here's another helpful hint. Some specimens, mainly from bulldozed dumpage,
are so badly scratched and abraded allover that it looks hopeless. Not so! First
fill in any broken out areas and do the paint touchups as required. Just paint
entirely over all the scratches and abrasions and then wipe off the painted
area. Just as with engraving plates, the paint fills the scratches and comes off
elsewhere.
Now, after everything dries very thoroughly, apply a coat of Future floor wax
to the entire insulator. This is tricky. Fold a part of a paper towel into
several layers and saturate with the liquid wax. Rotating the insulator on your
finger in the pin hole, apply the wax from top to bottom of the insulator as
quickly and evenly as possible. If you go over one area and come back over that
area even a little later, you'll have a sticky mess.
Do the outside area first. After it dries so you can hold it there, do the
inside. If you botch it up, take the wax off with ammonia and try again. If a
second coat is needed, allow plenty of time for the first coat to dry.
After the waxing, the insulator may have a slightly tacky feel which is
unnatural. To remedy this, spray it liberally with Endust, then wipe off all of
this you can get off with a soft rag. If you don't have Endust, use any
household oil.
Broken skirts and crown ears on pin types have an uncanny knack for wiping
out a portion of the marking, if any. Assuming you know the exact form of the
marking stamp, you can complete the marking after you have filled in the broken
part of the skirt. Scribe in the missing part of incuse markings on your tile
cement repair; paint on missing parts of any underglaze markings.
This form of restoration is super easy to do. It takes no special equipment
and really no special skills. It's fun to do and will enhance the appearance of
your collection. There just aren't enough of those old classics to go around, so
every time we can fix up another decrepit survivor so it looks good on our
insulator shelves, we're ahead of the game.
Proper restoration of specimens is a worthwhile endeavor and should even be
encouraged, but my last word on this is to admonish you not to get carried away
with ambition when you start applying the plaster and paint. The following
excerpts are from the National Insulator Association's Code of Ethics and
General Show Floor Rules:
NIA Code of Ethics:
#1. NIA members shall not engage in the manufacture, sale or exhibition of
insulators or related items which can generally be termed frauds and which
include, but are not limited to, deceptive reproductions or altered physical
characteristics in any manner. (Emphasis mine, JHT)
NIA Show Floor Rules:
#3. No fakes, alterations or deceptive reproductions of insulators or related
items may be brought onto the show premises at any time.
#4. All repaired items on sales tables must be clearly labeled as such.
Jack
HOW TO SURVIVE THE GRAY-SACK TREATMENT
Mailing a nice old insulator specimen to a distant buddy is a waste of time
if you can't be sure it will get there in one piece, even if you do insure it.
It's almost a sin to risk breakage of a rare classic with inept packing methods.
Evidently there is a complete ignorance of the public as to the transport and
handling methods used by the Post Office Department (more recently U. S. Postal
Service). Let's take a tour down there to see where you went wrong when
reasoning out your insulator packing methods.
You hand your package to the clerk at the counter, making sure he sees all
the big FRAGILE stickers you've applied, and after he collects the postage and,
of course, the extra 65 cents or so you forked out for insurance, he carefully
places your package into one of those ominous "gray sacks". Chances
are this is the last light of day your box will see until it reaches your
buddy's distant city. If somehow you can find boxes big enough (but under
100" length-girth) that they won't go into those gray sacks, it's classed
as an "outside" (the sack) and may have a little bit better chance.
The first rule is that anyone will be fired if caught in the act of carrying
a gray sack; they must be picked up and tossed -- or hurled. They are tossed
into carts, damped onto conveyors, tossed and stacked 10' high in trucks, thrown
out of tracks onto other conveyors, into airplanes, out of airplanes 20' onto
conveyors, dollies or bare pavements.
As a gray sack goes flying through the air headed for the concrete dock at
the back of some postal annex sorting station, your box my be lucky if it's at
the top part of the sack when it lands. But wait. Here comes the next sack for
the pile, and right in the bottom of it is a small wooden box containing a 1/2
horsepower motor. This dense mass is just too lethal a missile for your box.
Hello insurance.
Your box is seldom handled individually in its travels. Postal employees
can't possibly read all your FRAGILE notes through the gray sacks, so why waste
the ink?
Contrary to what was said (partially in error) on bottom of page 3, July 1976
CJ, the "Special Handling" is only an expediting device (first into
track, first out of truck, etc.) and has nothing to do with the physical
handling (or mishandling). Except for possibly single Special Handling parcels
going short distances between small towns, Special Handling parcels are also
"gray sack" items. If you are mailing Special Handling between any
distant points to get improved physical treatment, you're deceiving yourself.
Regardless of what you write on your parcels, how much you spend for
insurance or waste on other services unrelated to physical handling, you simply
have to know how to survive the gray sack treatment. The secret is understanding
the mechanics of how your parcel gets crunched.
If you pack poorly, here's what happens. Toss your box out of your second
story window onto the concrete sidewalk below. If anything can possibly move
downward, it will, The insulator on top will force itself through your packing
to crash against the one just below it. If the packing is bad enough, all of the
insulators will not only collide, but the whole mass will break on the concrete
below.
But if you do survive several of these second-story drop tests, try this one.
Tie together three ordinary building bricks, take aim from the second story
window, and drop them on your box below -- at least once on each side. Naturally
those flimsy styrofoam peanuts, that tissue paper, or those rolls of foam rubber
can't possibly stop those bricks. No way. But there is a way! Here's how.
Your feathery packing has it backwards. Your box must be the most lethal
missile in the sack! It should be packed so tightly that you cannot dent it with
a 10-pound maul. Even if thrown out of an airplane from 10,000', it should be
impossible for one insulator to approach the adjacent one. Here's how you do it.
First, get a reasonably sturdy corrugated box and a stack of newspapers about
a foot tall. Wrap individual newspaper sheets around the insulator one at a
time, allowing the sheets to crumple as you go. Two or three sheets will do it.
Start with a layer of crumpled newspaper about 1" or more thick in the
bottom of the box. Separate each sheet and then crumple it. Pack these hard, not
loosely. You should be able to stand on them and still have them 1" thick.
You'll be surprised at how much paper you've used already -- maybe all of the
Monday paper and part of Tuesday's.
Now place the individually wrapped insulators in the box spaced so they are
at least 1" from any edge of the box or from touching each other.
Start ramming individual newspaper sheets in crumpled fashion in all
available space in the box, especially noting all the outside surfaces of the
box and between the insulators. Push down each crumpled sheet as hard as you can
as you go. Even use a stick or hammer handle to force the paper down tighter.
Fragile glass will not take impact, but you can not apply enough distributed
pressure to break it. If you can even barely force a screwdriver down into the
paper at any point, you're not packing it firmly. Start over.
By the time you get all the space in the box around and between the
insulators filled, and a packed layer at top, you should have gone through the
rest of the weekly issues of the paper, including the Sunday edition -- and
maybe part of next week's too. It's amazing how you can get 4 insulators and a
12" stack of papers all into a 10", box. But if you can't do it,
you'll never last in the gray-sack treatment.
You should find your super-compressed box rather bulging at its sides now,
even if it was a heavyweight carton. Tape the top seam, and retape the bottom
seam. Do not rely on any tape that came with the empty box! Now run filament
tape completely around the box in each of the three directions. These will keep
the box from bursting under its own internal pressure upon impact.
Now you're ready for tests. Wrap up four Hemingray-42's in a medium-sized box
by the above methods. Go downtown and drop it out of the 4th story window of the
First National Bank building at least six times. This will take considerable
time even using the elevator, and the people there will think you're nuts. Take
along your wife to keep people out of the way below so you can avoid any
lawsuits for injury.
Now take the box home. Drop a standard 16" concrete building block onto
it, once on each side from a height of about six feet.
Unpack the box, and your jewels should be unscathed. As a final requirement
to your packing certification, you must then try to get all the crumpled paper
on the floor back into the empty box, pushing and stomping on it as hard as you
can. If you can get more than 75% of the paper back in the empty box, you didn't
use enough packing and flunk the test even though the insulators weren't broken.
I have mailed literally hundreds of boxes of insulators, both glass and
porcelain, in the past 10 years -- and also many parcels of all sorts of other
fragile things. I have never had one parcel lost, and I have never had one item
broken in the slightest way.
Because I know how to survive the gray-sack treatment, I have never insured a
single parcel with the P.O.D. I could easily buy several cobalt Mulford &
Biddles with the money saved by not insuring, not to mention all the fuss in
making claims on broken insulators forever lost from the scene.
Use this packing method for other items. When you mail a toaster as a
Christmas gift, don't just put some stamps on the box it came in from Sears.
Open up the box and start packing in the crumpled paper as tight as you can get
it so nothing can move and so no other lethal missile can possibly dent the side
of your box. Pocket the insurance money!
If all this helps save one old insulator from destruction, it will have been
worth it. Besides, I and other taxpayers have enough burdens without subsidizing
those who continue to collect insurance on poorly packed parcels.
Jack
Dear Jack:
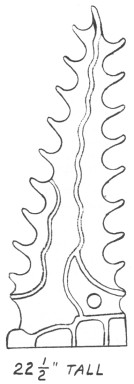
Enclosed is a drawing of something I am told is an insulator. It is brown
porcelain with no markings. The loops have a little wear and seem like they
could have held wires. From a side view the loops are 3-1/2" wide and the
wavy portion is 6" wide. One side is straight up, and the other side
slanted. Any information you have as to what this thing is would be greatly
appreciated.
Jim Dahlberg,
Walnut Grove, CA
- - - - - - - - -
Dear Jim:
I have no firsthand information on the item you have, but here is
what our troops out in the collector field have to say.
Most of these have an anchor and S. NAVY marked on them, and they are
allegedly insulators used in submarines. (If so, probably to hold arrays of low
voltage cables in battery rooms??)
They are pictured in Brown's 2nd Edition, page 136 and also Tibbitts' Vol. 3,
page 99. Tibbitts states they come in various colored glazes and that he has
seen another pair just about half this size. (All I have seen are these big ones
in brown glaze. JT)
Needless to say, collectors tagged these with the nickname "Christmas
Tree". I've seen them for sale at flea markets and shows in past years,
usually with price tags around $20.
You must admit they're a spectacular piece of ceramic sculpture -- possibly
even pretty enough that mama would allow it in the living room where more
mundane insulators are ordinarily taboo. This insulator was the central piece of
the prize-winning "INSULBUG" display exhibited several times at
insulator shows by the Yorks (Idaho).
Jack

Dear Jack:
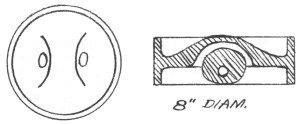
I've enclosed a sketch of a small porcelain something which I hope you can
tell me something about. It is white, crude, no embossing.
A neighbor of mine found two of them in a box of junk in a friend's garage
and thought they might be insulators. I think so too. Please let me know what
you think about it!
Clarice Gordon,
San Diego
- - - - - - - - -
Dear Clarice:
Well, I guess I'd have to think you are both wrong. They are bottle stoppers!
As such, I've turned your sketch right side up and added the rubber grommet in
the groove. These are patent #491,113 of Feb. 7, 1893, Karl Hunter, New York
City. The heart-shaped hole is for a bail wire to attach the stopper firmly in
the neck of a bottle.
I have similar ones different in overall shape, but they also have the
bail-wire hole and the groove for grommet. These should be a fair
"goody" for antique bottle collectors, so I guess it was a pretty good
find after all!
Incidentally, Dora gives me a gold star every time I can identify these
insulator-like whatisits; and so, thanks.
Jack

Dear Jack:
In response to your additional quarry, the C. F. Co. logo is on a pin type.
It's similar U-729, dark brown glaze with black underglaze markings. (See the
August 1976 Crown Jewels for this marking.)
I just picked up two other insulators for my collection which are unusual to
me and would appreciate any information you can provide about them.
One is a white U-291A with the marking Findlay 180-1 (Findlay marking #1 in
your book).
The other is a white U-39 with an F. K. LOCKE marking on the crown. The pin
hole and inside of the skirt are unglazed.
Arthur E. Jones,
Newcastle, Maine
- - - - - - - - - -
Dear Arthur:
I suppose we should now record the C. F. Co. as a marking for pin types, so
now we have to try to identify it. Seems as though I don't have much luck doing
this by asking people there. I have much better success when I go to the
factories and dig the info out of the file cabinets myself.
The Fred Locke ponies are commonly seen in light brown glazes, and they are
quite scarce in white, I've never seen one with the unglazed interior parts.
Must be a freak.
Any items with Findlay markings were scarce five or more years ago, and only
a couple of styles and marking types were known for a long time. However, quite
a few styles with various Findlay marking stamps are now in collections and
available on trade lists or at shows. It just took a few years for collectors to
round them up off of old lines. Some have also come from dump digging at the old
plant in Findlay, Ohio. Most are either white or an ucky chocolate brown. The
ones in cobalt and yellow are still on the scarce side, and some styles (shapes)
are still scarce.
Jack
Dear Jack:
I recently picked up what I believe is some sort of a guy strain at a flea
market. I tried to draw some sketches of it.
It is kind of a blotchy brown and has no markings. I would appreciate any
information on the manufacture, the reason for the design, and its value.
Mark Wilke,
Santa Barbara, Cal,
- - - - - - - - -
Dear Mark:
This insulator is a dead-ending (strain) type, or as first used in suspension
strings. The original design (circa 1907) was by Edward M. Hewlet of General
Electric Co., and they are universally called Hewlet Insulators. Subsequently,
similar designs but with flat tops (no recessing) were used for suspension
strings and other vertical applications.
The design was conceived early in the life of suspension lines (originally
called "underhung lines") along with many other forms of positively
interlocked insulating sections.
Suspension disks with cemented ends had been developed by Locke in the
1903-05 period, but they were mechanically very archaic and of questionable
reliability. Commencing about 1910, the Ohio Brass Co. devoted considerable
effort to the development of better suspension insulators with cemented end
terminals. These designs quickly superceded the Hewlet types which were a rather
clumsy affair to install in strings.
After many millions of these "perfected" suspensions had been
installed in succeeding years, catastrophe struck. Suspension failures became
alarmingly high (the cemented terminals giving way). It's no laughing matter
when suspension lines start falling from the towers down into the urban areas
underneath.
As a matter of dire necessity, there was a rapid reversion to the Hewlet
design which was at least unquestionably reliable against dropping lines.
General Electric frantically produced these at their old Victor plant, and was
probably further influenced in their decision to build the new insulator plant
at Baltimore (completed in 1922).
G.E. also licensed Thomas to make Hewlet insulators, and one of Thomas'
saving contributions was the development of a complete line of hardware which
allowed the Hewlet disks to be assembled together in strings nearly as easily as
the cap-and-pin designs. With this improvement, Thomas continued to put emphasis
on marketing Hewlet insulators for many years and was still making them up into
the 1940's.
Ohio Brass Co. was never licensed to make Hewlet insulators, possibly because
of past friction between O-B and the Locke Insulator Mfg. Co., but more probably
because they were a very progressive company that loomed as the greatest threat
competitively to Locke. Thus O-B continued the development of a reliable
cap-and-pin design, and this was ultimately achieved, together with work done
by Lapp, Locke and Thomas.
Unfortunately for the others, O-B obtained such basic patents (quick-detach
cap assemblies etc.) along the way that the other companies were limited for
many years. Thomas never again became a real serious threat in the suspension
insulator market, and it took G.E. and Lapp 40 years to dig their way out from
under O-B's head start.
By the early 1930's, O-B's most important suspension patents had expired, and
utilities had become convinced that the cap-and-pin designs were finally
reliable. (Note that these modern designs are such as to operate the porcelain
and the cement in compression, not in tension.) Even though Thomas persisted in
Hewlet manufacture for a few more years, the era of Hewlet insulators rather
abruptly ended at this time.
Of the many millions of Hewlets made in the 1920's, most have been replaced
with cap-and-pin designs as lines were rebuilt or replaced with bigger lines.
However, some Hewlets are still in service as suspensions and many more as link
strain insulators (deadends etc.). They continue to come into utility salvage
yards and therefore are widely available in collector circles.
However, the specimen sketched above appears to be one of the very early
Locke production. These had straight sides and other features quite different
from designs evolving well before 1920. Most such early units probably got
scrapped when the first cap-and-pin units came into use in the 1910-1920 period.
I know of only several of these very early ones turned up by collectors.
The story of the role played by Hewlet insulators in the evolution of
reliable transmission lines is so interesting that any surviving specimens of
this very early vintage should be treated as museum pieces. It's difficult to
place valuations on them in terms of dollars and cents. Many people are not
interested in collecting forms of suspension and strain insulators, but they
might be really turned on by these first crude attempts to evolve workable
suspension designs. Much water has flowed under the bridge since this particular
Hewlet specimen left the old Locke plant at Victor about 65 years ago. I
consider it a goody.
Jack
| 
)
)
)
)